So you have some files that you don’t want anyone accessing. Your Mac is already pretty secure, but what happens when you want to encrypt a USB drive?
- Encrypt External Drive Mac
- Encrypt External Drive Mac Os Mojave Download
- Encrypt External Drive Mac Os Mojave Free
- Mac Os Mojave Encrypt External Hard Drive
- Mac Encrypt External Disk
Jun 04, 2020 How to encrypt the newly-formatted card It's now time to encrypt the newly-formatted card. Open Finder and right-click (or double-finger tap) the SD card listing in the left pane. From the menu. Jan 18, 2019 In the event that you need to unlock an unbootable FileVault-encrypted boot drive on macOS Mojave, it's possible to do so using Disk Utility and the password to a FileVault-enabled account on the drive. For more details, see below the jump. To unlock an encrypted boot drive, please use the procedure shown below: Note: For.
This is where disk encryption comes in. Basically, it’ll keep your USB thumb drive safe by encrypting the data on it and requiring a password to access it.
Installing the Mac operating system on an external drive is the safest way to get a good look at a new OS without changing anything on your Mac. In fact back when we started running Mojave. Jan 15, 2019 Encrypting a flash drive on macOS Mojave can be challenging. This is because all devices are not shown in the disk utility sidebar. Thus, it is more challenging for the user to find the erase. Dec 16, 2018 How to Encrypt a USB Flash Drive in Disk Utility. Launch Disk Utility, located on your Mac in Applications/Utilities. In the Disk Utility toolbar, click the View button and select Show All Devices if it isn't already ticked. Select your USB flash drive in the sidebar by clicking its top-level.
You may not know this, but macOS actually has a few built-in USB encryption features baked into its software — letting you encrypt and decrypt USB drives and other storage media on the fly. Here’s how to use them.
Contents
- 2 Leverage Disk Utility on macOS to encrypt USB drives
- 3 USB drive encryption that works with Windows PC and Mac
Related:
Use Finder to encrypt USB drives on MacBook
As of macOS Mojave, you can easily encrypt and decrypt generic mass storage devices on-the-go using Finder.
This uses XTS-AES encryption, which is the same type of encryption that the macOS FileVault 2 system uses. Keep in mind that using Finder to encrypt a thumb drive will restrict its usage to macOS. You won’t be able to access the data on it on a Windows or Linux machine.
- Plug your thumb drive or generic mass storage medium into your Mac.
- Open Finder.
- Right-click the thumb drive in the left sidebar. It’ll be under Locations
- Click on Encrypt “(Name of mass storage drive)”. If you don’t see this option, skip to the note below.
- Finder will now prompt you to enter a password and a hint. This will be used to access the data on your thumb drive — so don’t lose it!
- When all of that is typed in, click Encrypt Disk.
Finder will then encrypt your thumb drive. Depending on how much data is on it, the process could take a while.
To access the contents of the thumb drive, you’ll need to input the password that you created earlier. There’s absolutely no way to reset this password, so make sure you write it down in a safe place or use a password management platform.
Encrypt External Drive Mac
Note: If you don’t see the Encrypt option when you right-click the thumb drive, it means that the USB storage device isn’t in the proper format to use the baked-in macOS encryption. You’ll need to use the following method to encrypt your drive.
Leverage Disk Utility on macOS to encrypt USB drives
As we covered, if you don’t see the Encrypt option, it means that your USB device hasn’t been formatted with a GUID partition map — which is a requirement for Finder encryption.
To get the encryption option, you’ll need to erase your thumb drive and then encrypt it in Disk Utility. Of course, make sure to copy all of the data from your USB drive to a safe location. Somewhere on your Mac’s internal disk is a good option. Once your data is somewhere safe, you can go about actually erasing and encrypting your flash drive.
- Open Disk Utility. You’ll find it in Applications —> Utilities in Finder or in the Utilities folder in Launchpad.
- In the top Disk Utility menu bar, click on View.
- Now, select the Show All Devices option to check it if it isn’t ticked already.
- Select your USB thumb drive from the left-hand sidebar. Make sure to click on the top option, not any subsequent device names listed underneath it.
- Click the Erase option in the Disk Utility toolbar.
- Give your USB thumb drive a new name.
- Under the Scheme menu, make sure you have GUID Partition Map selected. You’ll need to change this before selecting the Format. Which brings us to…
- Under the Format menu, select Mac OS Extended (Journaled, Encrypted).
From here, you’ll be prompted to input a password and hint again. Like with the Finder method, you’ll want to keep this in a safe place because there’s no option to reset it. When you’re done, click on Erase.

When all is said and done, copy all of the data that was originally on your thumb drive back from the safe location. Once it’s on the drive, it’ll automatically be encrypted and password-protected.
Alternate method
Alternatively, you can also set the Format to Mac OS Extended (Journaled) and the Scheme to GUID Partition Map. This won’t encrypt your USB drive within Disk Utility, but it will allow you to encrypt it using the simple Finder method.
This may be the preferred option if you don’t want to commit to an encrypted drive and password immediately, but you want to be able to encrypt your storage medium on-the-go later on using Finder.
Feb 26, 2020 Symptoms such as these could mean that a device connected to the USB-A, USB-C, or Thunderbolt 3 (USB-C) port on your Mac isn't getting enough power. A message says that the device needs more power, the operation can't be completed, or USB devices are disabled until you unplug the device using too much power. Mac os x usb drive connect with thunderbolt 3.
USB drive encryption that works with Windows PC and Mac
The above two methods will make sure that your data is safe and protected no matter what happens. But, of course, they’ll only work on macOS devices. This is because the Mac OS Extended format, true to its name, is only compatible with Apple computers.
If you need to access your data from a Windows PC or a Linux machine, then you’ll want to opt for a third-party encryption solution. A couple of high-quality options are DiskCryptor and VeraCrypt.
They’re both completely free to use and open source, but they don’t skimp on the encryption quality. In fact, both apps offer a variety of different encryption options — such as AES, Twofish and Serpent.
You can’t go wrong with either. They’re both also fairly simple to use, so we’ll refrain from offering any in-depth instructions on how to encrypt using them. Just make sure to encrypt your drive using a Windows- or Linux-compatible format like FAT32.
For more information, you can visit their respective websites.
Encrypt External Drive Mac Os Mojave Download
If you use USB drives to carry information, it is always a good idea to encrypt the drive so that your privacy and security is protected in the case you lose the drive. This is particularly true if you use thumb drives to store personal photos or contract documents etc. We hope that you find these tips helpful. Please let us know in the comments below if you have any questions for us.
Mike is a freelance journalist from San Diego, California.
While he primarily covers Apple and consumer technology, he has past experience writing about public safety, local government, and education for a variety of publications.
He’s worn quite a few hats in the journalism field, including writer, editor, and news designer.
Related Posts:
Long-time readers of the Rocket Yard have probably heard us mention Apple’s FileVault Encryption, which is a way to encrypt the startup disk on your Mac. In this Mac 101 article, we’ll take a detailed look at FileVault, how it works, things to watch out for when using it, and why owners of Mac laptops should consider using FileVault. The current implementation of FileVault is known as FileVault 2 — for the purpose of brevity in this post, it will just be called FileVault.
What’s Encryption?
When a Mac stores information on a hard disk drive (HDD) or solid-state drive (SSD), it is generally written in a format that can be easily read by anyone with a computer. In other words, if someone stole a Mac, removed the unencrypted startup disk, and connected it to another computer with the proper cable, they would have access to read all of the files on that computer. Encrypting the disk means that the information stored on it is encoded using an algorithm (also known as a cipher) that scrambles the data and makes it readable only by someone holding a decryption key. That “key” can be a password or some biometric means of identification.
When a Mac stores information on a hard disk drive (HDD) or solid-state drive (SSD), it is generally written in a format that can be easily read by anyone with a computer. In other words, if someone stole a Mac, removed the unencrypted startup disk, and connected it to another computer with the proper cable, they would have access to read all of the files on that computer. Encrypting the disk means that the information stored on it is encoded using an algorithm (also known as a cipher) that scrambles the data and makes it readable only by someone holding a decryption key. That “key” can be a password or some biometric means of identification.
How Good Is FileVault Encryption?
FileVault uses an encryption method known as “XTS-AES-128 encryption with a 256-bit key” to encode the information on a disk. That method is quite secure; a Wikipedia search showed that “Breaking a symmetric 256-bit key by brute force requires 2128times more computational power than a 128-bit key. Fifty supercomputers that could check a billion billion (1018) AES keys per second (if such a device could ever be made) would, in theory, require about 3×1051 years to exhaust the 256-bit key space.” It is very unlikely that a typical laptop thief could break FileVault encryption before the end of the universe, by which time the information stored on the disk would be quite irrelevant anyway.
FileVault uses an encryption method known as “XTS-AES-128 encryption with a 256-bit key” to encode the information on a disk. That method is quite secure; a Wikipedia search showed that “Breaking a symmetric 256-bit key by brute force requires 2128times more computational power than a 128-bit key. Fifty supercomputers that could check a billion billion (1018) AES keys per second (if such a device could ever be made) would, in theory, require about 3×1051 years to exhaust the 256-bit key space.” It is very unlikely that a typical laptop thief could break FileVault encryption before the end of the universe, by which time the information stored on the disk would be quite irrelevant anyway.
What Macs Can Use FileVault Encryption?
FileVault is actually a feature of Mac OS X and macOS, not a hardware function. Beginning with Mac OS X 10.7 “Lion” and continuing up to the present-day macOS 10.14 “Mojave”, FileVault has been available for anyone who wishes to have the best possible physical security for their information. Many corporations have a policy of requiring employees with MacBooks to enable FileVault, and it’s an excellent security measure for anyone using one of Apple’s laptops.
FileVault is actually a feature of Mac OS X and macOS, not a hardware function. Beginning with Mac OS X 10.7 “Lion” and continuing up to the present-day macOS 10.14 “Mojave”, FileVault has been available for anyone who wishes to have the best possible physical security for their information. Many corporations have a policy of requiring employees with MacBooks to enable FileVault, and it’s an excellent security measure for anyone using one of Apple’s laptops.
How to Enable FileVault
When FileVault is turned on, you’ll need to use your account password or Touch ID to log into your computer. It is not possible to set a FileVault-enabled Mac to log in automatically with no password. Here’s how to enable FileVault:
When FileVault is turned on, you’ll need to use your account password or Touch ID to log into your computer. It is not possible to set a FileVault-enabled Mac to log in automatically with no password. Here’s how to enable FileVault:
1) Launch System Preferences from the Apple ( ) menu > System Preferences, from the macOS Dock, or from the Applications folder.
2) Click the Security & Privacy button.
3) Click the FileVault tab
4) Click the lock icon (?), then enter an administrator name and password.
5) Click “Turn On FileVault…” (see screenshot below)
(The FileVault tab of the Security & Privacy pane in System Preferences)
If there are multiple user accounts set up on this Mac, a message appears saying that “Each user must type in their password before they will be able to unlock the disk” (see screenshot below). For each user, click the Enable User button, then enter the user’s password. Any user accounts added after FileVault is enabled are automatically set up to use FileVault.
(Each user account must be enabled to use FileVault by entering a password)Next, you need to decide how you want to be able to unlock your disk and reset your password if you ever forget that password. There are three different ways to do this:
1) For Mac OS X 10.10 “Yosemite” and later, you can choose to use your iCloud account to unlock the disk and reset your password.
2) For Mac OS X 10.9 “Mavericks” only, you can choose to store a FileVault recovery key with Apple. To unlock that recovery key and make it possible to unlock the disk, you must provide three security questions and the answers…all of which you need to remember.
3) You can create a local recovery key. You do NOT want to save this recovery key on your encrypted startup disk. Instead, it should be saved somewhere else safe, like printed and stored in a personal safe or safety deposit box, or stored in the Notes app on an iPhone or iPad in a password-protected note.
Saving to the same drive substantially lowers your chances of recovery.”. A drive icon will appear, which once you double click will give you the option to open the files as you would do before they were lost. 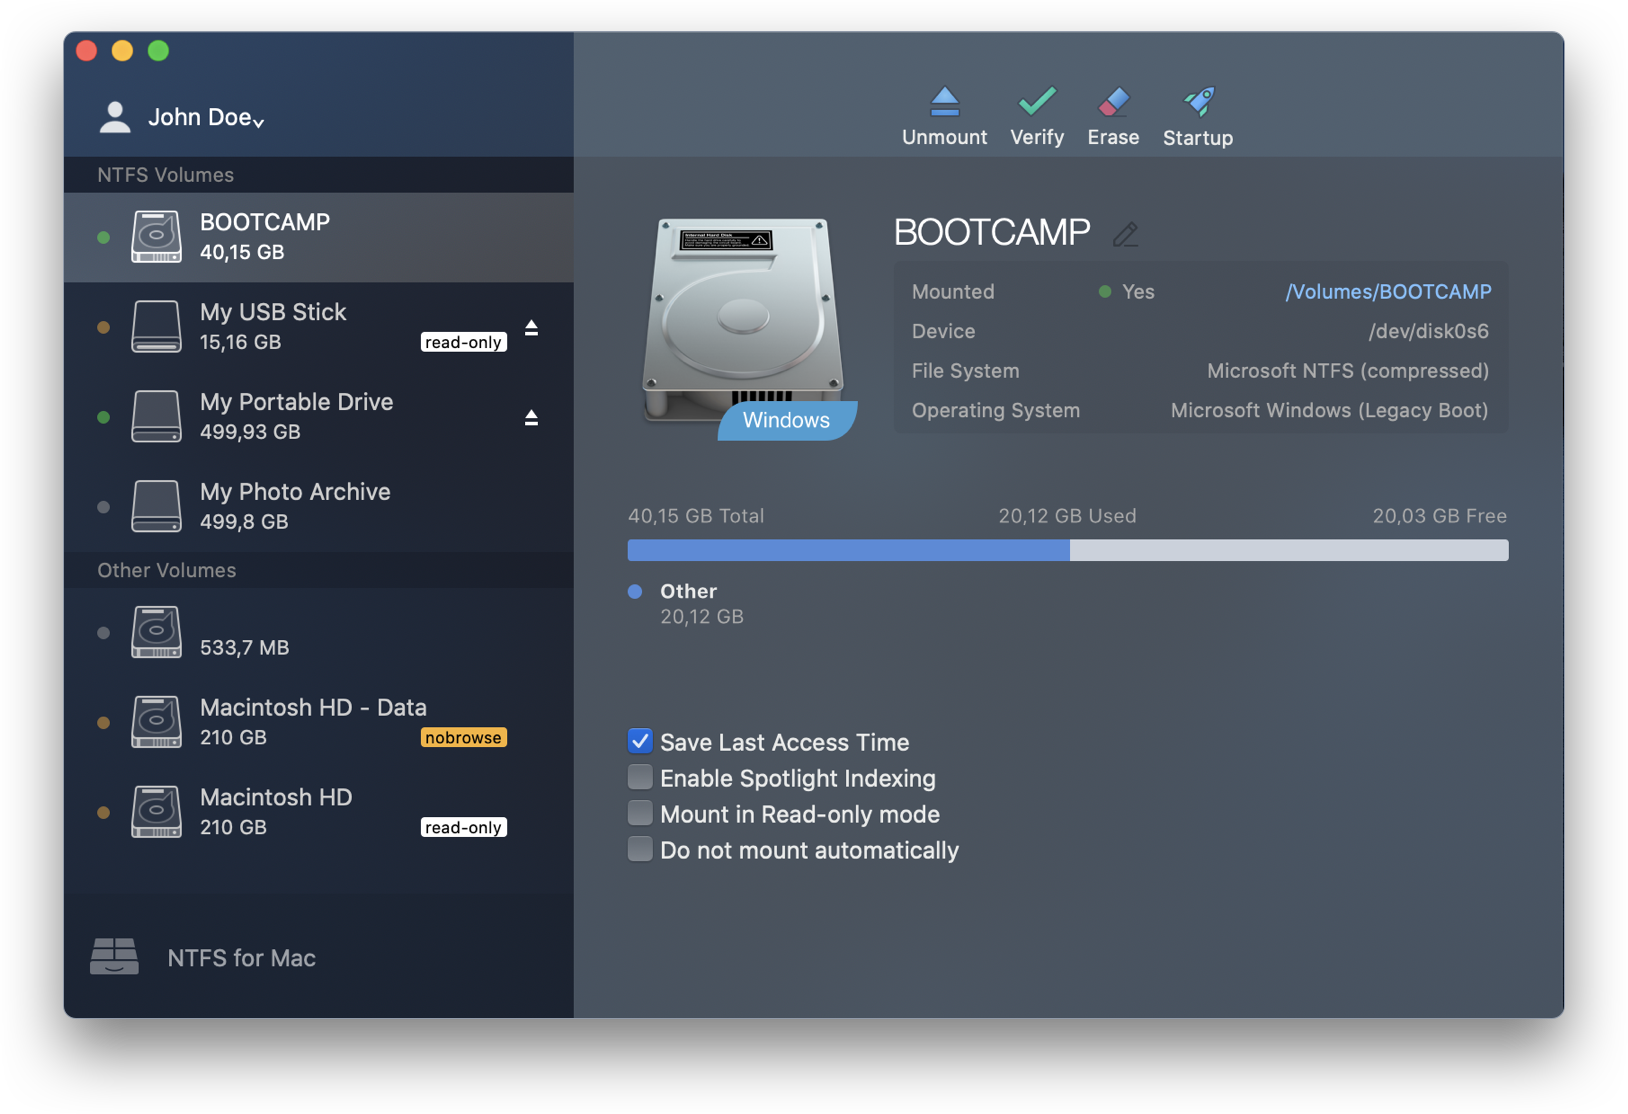
Apple makes a point of letting you know that if you lose your account password and the FileVault recover key, you will not be able to log in to the Mac or access the data on the startup disk. This is important to remember!
What Happens Once FileVault Is Enabled?
Once FileVault is enabled, it encrypts the startup disk as you use the Mac but only when the computer is awake and connected to AC power. That’s important to note — FileVault will not encrypt a MacBook’s disk when the computer is asleep or on battery power.
Once FileVault is enabled, it encrypts the startup disk as you use the Mac but only when the computer is awake and connected to AC power. That’s important to note — FileVault will not encrypt a MacBook’s disk when the computer is asleep or on battery power.
To check the progress of FileVault encryption, just look at the FileVault tab of Security & Privacy Preferences. As you create new files, they’re automatically encrypted while being written to the startup disk.
After FileVault has finished encrypting the startup disk and you restart the Mac, entering your account user ID and password unlocks the disk and lets the Mac finish startup.
How To Change the FileVault Recovery Key
To change the recovery key that’s used to encrypt the startup disk, turn off FileVault in Security & Privacy preferences. Turn it on again, and a new key is generated. All older keys are disabled.
To change the recovery key that’s used to encrypt the startup disk, turn off FileVault in Security & Privacy preferences. Turn it on again, and a new key is generated. All older keys are disabled.
How to Reset Your Password Using the Reset Password Assistant
In the unlikely event that you forget your account password or it just doesn’t work, there’s a way to try to reset your password using the Reset Password Assistant. This assistant only appears if FileVault is enabled.
In the unlikely event that you forget your account password or it just doesn’t work, there’s a way to try to reset your password using the Reset Password Assistant. This assistant only appears if FileVault is enabled.
1) Once the Mac has been turned on or restarted, wait (it could take up to one minute) until a message appears saying that you can use the power button on your Mac to shut down and then start up again in Recovery Mode. If this message doesn’t appear, then FileVault isn’t on.
2) Press and hold the power button until the Mac turns off.
3) Press the power button again to turn the Mac back on.
4) The Reset Password window appears. Follow the instructions on the screen to create a new password (see screenshot below)
(The Reset Password assistant only appears if FileVault is enabled)5) Once a new password has been created, click Restart to restart the Mac.
6) Now you should be able to log into the account with the new password. You may need to create a new login keychain if you see an alert that the system was unable to unlock. your login keychain. Usually, a Create New Keychain button appears in the alert, and clicking it resolves the issue.
How to Reset Your Password Using a FileVault Recovery Key
When FileVault is enabled and you have a FileVault Recovery Key, that key can be used to reset your password.
When FileVault is enabled and you have a FileVault Recovery Key, that key can be used to reset your password.
1) Keep trying to enter a password at the login screen until a message is displayed saying that you can reset your password using the Recovery Key. That message will not appear if FileVault is disabled.
2) Next to the message is a small triangle button; click it, and the password field changes to accept a Recovery Key.
3) Enter the Recovery Key using uppercase characters, and be sure to include the hyphens in the key.
4) Follow the onscreen instructions outlining how to create a new password, then click Reset Password.
If you still can’t log in with the new password after the Mac has been restarted, try these additional steps:
Encrypt External Drive Mac Os Mojave Free
1) Restart the Mac again and enter Recover Mode by pressing Command ( ⌘ ) – R or one of the alternate keyboard shortcuts (Option – ⌘ – R or Shift – Option – ⌘ – R). Release the keys when the Apple logo, a spinning globe or a firmware password prompt appears. The macOS Utilities window appears (see screenshot below)
(macOS Utilities)2) You don’t want to select any of the utilities that are listed. Instead, select Utilities > Terminal from the menu bar.
3) In the Terminal window, type “resetpassword” (no quotes) and press Return to open the Reset Password Assistant. On the Assistant screen, click the radio button next to “My password doesn’t work when logging in”, then click Next and follow the instructions to reset the password for your user account.
Disabling FileVault
When you’re going to sell or turn over a computer to another person and you’ve enabled FileVault, you’ll want to disable it as the new owner will not know the password. It’s a much better idea in this case to reinstall macOS over the existing copy using Recovery Mode and the Reinstall macOS command as seen in the screenshot above. However, if you to need to actually disable FileVault, it’s quite simple.
When you’re going to sell or turn over a computer to another person and you’ve enabled FileVault, you’ll want to disable it as the new owner will not know the password. It’s a much better idea in this case to reinstall macOS over the existing copy using Recovery Mode and the Reinstall macOS command as seen in the screenshot above. However, if you to need to actually disable FileVault, it’s quite simple.
1) Launch System Preferences, click the Security & Privacy button.
2) Click the FileVault tab.
3) Click the lock (?) and enter an administrator name and password.
4) Click Turn Off FileVault.
Mac Os Mojave Encrypt External Hard Drive
Now give the Mac time to decrypt the startup disk. As with the encryption process, this usually takes place in the background as the Mac is being used, and the Mac must be plugged into AC power. Like the encryption process, decryption progress can be checked in the FileVault section of System Preferences.
When You Can’t Enable FileVault
There are some situations that prevent enabling of FileVault, and those are situations where a local Recovery System (also known as macOS Recovery) is not installed on a Mac. FileVault requires a Recovery System to encrypt the startup drive.
There are some situations that prevent enabling of FileVault, and those are situations where a local Recovery System (also known as macOS Recovery) is not installed on a Mac. FileVault requires a Recovery System to encrypt the startup drive.
What will cause macOS to install without a Recovery System? Generally, it happens in two circumstances: first, when RAID partitions have been created on the startup drive or second, when a non-standard Boot Camp partition is on the startup drive. In both of those situations, it is necessary to either remove the RAID partitions or the non-standard Boot Camp partition before re-installing macOS with a Recovery System.
Be Sociable, Share This!
Mac Encrypt External Disk
OWC is on-site wind turbine powered at 8 Galaxy Way, Woodstock, IL 60098 | 1-800-275-4576 | +1-815-338-8685 (International)
All Rights Reserved, Copyright 2018, OWC – Since 1988
